This is a sandbox demo. It is intended to help you explore a specific TwikBot concept in isolation, using a pre-built product graph you can inspect and experiment with freely.
Overview
Color Basic - Demo shows the minimum setup required to implement a paint color switcher in TwikBot. The demo uses a utility buggy as its subject, with four selectable exterior paint colors rendered in real time.
The configurator consists of a single step (Colors and Trim) and exposes one UI control: a color swatch picker for the exterior paint. Selecting a swatch updates the material on the painted body parts instantly in the 3D viewer.

Product graph
The graph file for this demo can be downloaded and imported directly into TwikBot Create.
Nodes used
|
Node |
Link |
Purpose |
|---|---|---|
|
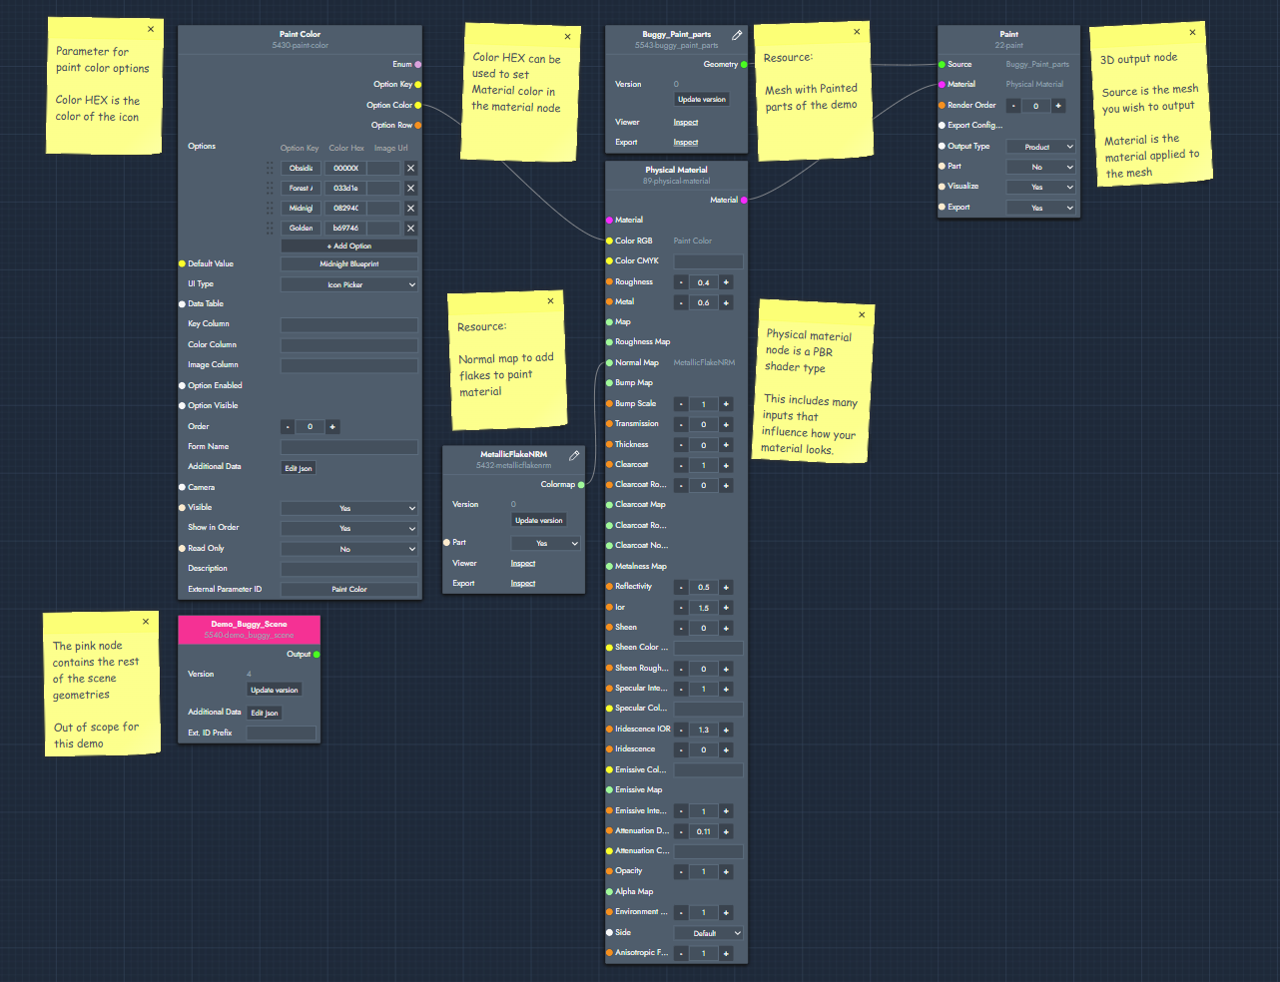
Option List — Paint Color |
Drives the UI swatch picker. Each option carries a display name and a HEX color value used for the swatch icon. |
|
|
Color Map Resource — MetallicFlakeNRM |
A normal map that simulates metallic paint flakes, making light behave realistically on the surface. |
|
|
3D Mesh Resource — Buggy_Paint_parts |
The 3D geometry of the painted hood and body panels of the buggy. |
|
|
Physical Material |
A PBR shader node that defines how the surface looks. Receives the selected color and the normal map as inputs. |
|
|
Macro — Demo_Buggy_Scene |
N/A |
Contains the rest of the buggy geometry. Out of scope for this demo, but included to complete the scene. |
|
3D Mesh — Paint |
The final output node. Combines the mesh geometry and material and renders them in the 3D viewer. |
Graph explained
This graph demonstrates how to wire up a color switcher using only a handful of nodes. Follow the steps below to understand the data flow.
-
Option List (Paint Color)
Start with an Option List parameter node. This is the UI element your end user sees: a swatch picker in the configurator sidebar. Each option has a name (e.g. Midnight Blueprint) and a HEX color value that drives the swatch icon color. -
Physical Material
Add a Physical Material node. This is a PBR shader that controls how the surface looks, covering roughness, metalness, color, and more. It accepts multiple inputs, but for this demo only two matter: the color channel and the normal map. -
Connecting the color
Connect the Option Color output of the Option List node to the Color RGB input of the Physical Material node. Because each option already stores a HEX value, no conversion is needed. The selected color flows directly into the material. -
MetallicFlakeNRM (Color Map Resource)
Connect a Color Map Resource containing the MetallicFlakeNRM normal map to the Normal Map input of the Physical Material. This makes the surface respond to light as if it contains metallic flakes, which is the same effect used in real-world automotive paints. -
Buggy_Paint_parts (3D Mesh Resource)
Add a 3D Mesh Resource node pointing to the Buggy_Paint_parts geometry. This contains the painted panels of the buggy, which is the geometry the material will be applied to. -
3D Mesh Output (Paint)
Add a 3D Mesh output node. Connect the 3D Mesh Resource as the Source and the Physical Material as the Material. This output node is what appears in the 3D viewer. It renders the painted body with the currently selected color applied.